How to Level and Adjust Rim Height on Your Portable Basketball Hoop
At SNA Sports Group, we’re committed to helping you maintain and maximize the performance of your basketball equipment— whether it’s one of our brand-new portables or one you’ve had for 35 years. If you’ve noticed your portable basketball hoop isn’t quite level or you need help adjusting the rim height, we’ve got you covered!
Leveling the Rim
- Check Level: Place a level side-to-side across the rim to check for evenness.
- Loosen Rim: Remove the cover plate under the rim, and there are four bolts holding the rim to the unit. Never touch the rear bottom bolts behind the backboard! Loosen all 4 bolts.
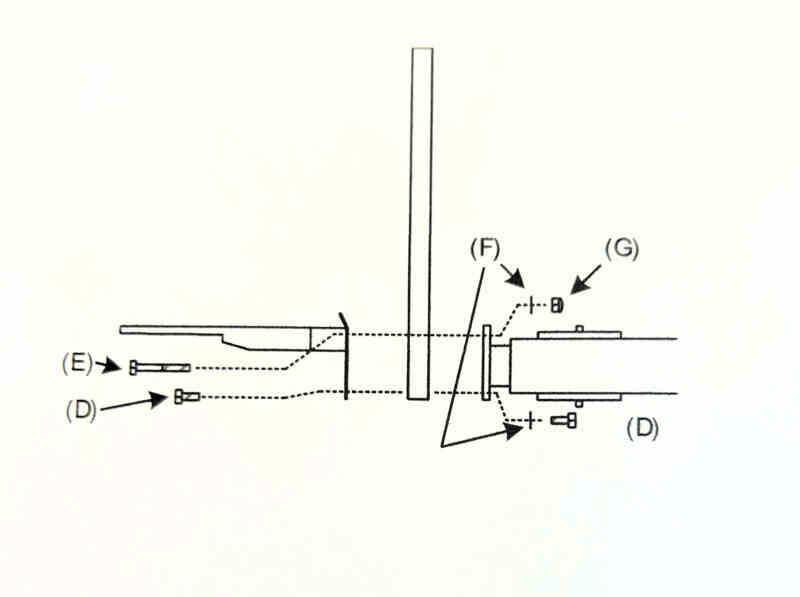
- Position the rim until level and then tighten the bottom two front bolts to hold position. Complete by tightening the top long bolts and replacing the cover plate.
How to Adjust the Rim Height on SNA Models
Over time, the rim height on a portable basketball hoop may change due to use, wear, or floor sag.
Over the years, we have manufactured several models of portable hoops, each with unique methods for adjusting the height:
- LEGACY (2017 – Present)
- US SAM (2007 – 2017)
- EURO SAM (1989 – 2007)
LEGACY (2017 – Present)
Adjusting Rim Height:
- Measure the Rim: Attach a tape measure to the front of the rim to gauge its height. See above if rim level needs adjusting or consult the SNA Sports YouTube video link below.
- Loosen the Jam Nuts: Loosen the 1-7/8” jam nuts where the KISS (Kinematic Integrated Stabilizing System) connects to the Vertical Sub-Frame Struts using your Adjustment Wrench.
- Adjust the Rim: Move the KISS Adjustment Nuts left to raise the rim or right to lower it.
- Recheck: Make sure both adjustment nuts move equally to keep the rim level and backboard square.
- Tighten the Nuts: Once the correct height is achieved, recheck the level of the rim and retighten the jam nuts to secure the adjustments you made.
For more detailed information, please see the Legacy 8-10 Tune Up Guide on our website.

US SAM (2007 – 2017)
Adjusting Rim Height:
- Measure Rim Height: Attach a tape measure to the front of the rim to gauge its height. See above if rim level needs adjusting or consult the SNA Sports YouTube video link below.
- Loosen the Jam Nuts: Loosen the 1-7/8” jam nuts where the DSF (Dynamic Support Frame) connects to the Vertical Sub-Frame Struts using your Adjustment Wrench.
- Adjust the Rim: Move the DSF Adjustment Nuts left to raise the rim height or right to lower it.
- Check Alignment: Ensure the rim is level during the adjustment, and both adjustment nuts move equally.
- Tighten Nuts: Once level, retighten the jam nuts to secure the position.
For more detailed information, please see the SAM US Model Tune Up Guide on our website.
EURO SAM (1989 – 2007)
General Maintenance:
- Check for Binding: If the struts are binding when passing through the blocks causing the sub-frame to move unevenly, lubricate the struts and roller bearings with lithium grease. This is suggested yearly.
- Keep Sub-Frame Attached: Before adjusting, make sure the sub-frame is fully down, the struts are in the sub-frame collars, and the horizontal “Frankenstein” bolts are tightened against the bottoms of the struts to ensure proper operation.
For more information, please see the SAM Pre-2008 Euro Model Tune Up Guide on our website.
Adjusting Rim Height:
- Prepare the Goal: Start with the goal in the upright game position (for Dynamic Sub-Frame models) or with the levers engaged (for Manual Dynamic Sub-Frame models).
- Measure the Rim Height: Attach a height tester or tape measure to check the initial height of the rim.
- Loosen Bolts: Loosen the “Frankenstein” bolts and set screws in the collar using appropriate tools (17mm wrench and 4mm Allen key).
- Adjust the Collar: Rotate the collar:
- To raise the rim: Rotate clockwise.
- To lower the rim: Rotate counterclockwise.
- Check Alignment: Recheck the height and alignment after adjustments.
- Tighten Nuts: Once the correct height is achieved, retighten the bolts and set screws to secure the new position.
For more information, please see the SAM Pre-2008 Euro DSF Height Adjustment on our website.
Watch and Learn: Rim Replacement and Hoop Leveling
For a step-by-step visual guide to make these adjustments yourself, check out this Rim Replacement and Adjustment video on YouTube where SNA Technician John Connors demonstrates how to change rims and level hoops.
Find the Right Parts for Your Hoop
Whether you’re looking to replace a rim, fix a height adjustment issue, or find other basketball hoop parts, check out our Parts & Service Page. We provide PDFs that detail the specific parts for each model, making it easy to find what you need.
Need Help? Send Us a Photo!
Not sure about the brand or model of your hoop, simply email us a photo. Our team can help identify your hoop, offer service recommendations, and provide the necessary parts for maintenance. If your hoop is one of ours, we can offer more detailed assistance, and even a few upgrades. Plus, if your hoop is older, we’d love to tell you more about our latest models.
Let’s keep your game on point with a properly adjusted and level hoop!